My content is reader-supported by awesome people like you. Which means I could earn a commission. Learn more here!
Are you considering Zenfolio to build your photography website?
I get it:
It’s a great overall builder with a ton of features to help you get started.
Best of all:
It doesn’t matter your skill level because they keep it simple for anyone to build a photography site that really stands out.
Get reading this Zenfolio review to see how it can work for you.
A Little Bit About Zenfolio
Zenfolio is perfect for photographers with and without knowledge of coding.
Novice and professional web designers see the value in the photography service because existing templates are easy to customize even without any knowledge of HTML.
There is also a custom template option for more advanced web design.
Signing up for the website takes minutes to complete and after selecting a template and uploading photos, members are able to launch their sites and start selling their photographs.
More detailed information is available to members through the account dashboard which serves as a valuable tool for updating information, viewing data, and adding additional photographs for sale.
The interface is clean, simple to understand, and offers members one-click options which save them time.
Zenfolio’s most prominent features are explained in detail through the Customer Support Center where additional information is contained.
In addition to being able to access text and tutorials, members are able to watch videos and attend training sessions through this area of the website.
This allows them to make the most of website features and maximize their sales through Zenfolio.
The response time is quick as you click on the chosen icon on the dashboard that you want to view.
Uploading photos and price lists take minutes to do and gives you the option to optimize descriptions using keywords.
This makes the work that you post searchable on the search engines and across the website.
Clients looking for a particular style of photographer can do so easily making Zenfolio great for photographers and people wanting to buy beautiful photographs.
Zenfolio onboarding process (Let’s see if it’s easy)
Let’s check this bad boy out really quick and sign up and just see if it’s a nice and helpful process to get you started hassle-free.
I went ahead and went to the main page
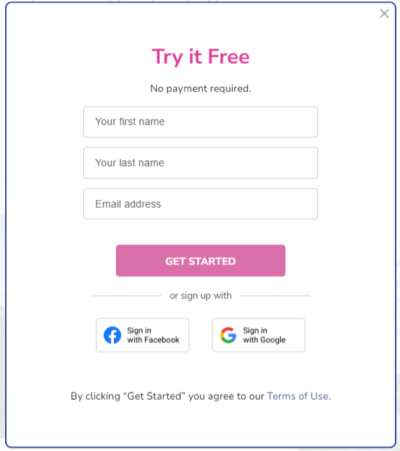
From here there is a button to “try it free” and the nice thing too is no credit card is needed.
A screen popped up like this
In general, it’s obvious we can connect an account we have or fill out some new info.
I manually did it myself.
From here were getting 3 onboarding screens
In the first one were filling out How would you like your name to appear on your gallery and website?
And the second one is creating a password for logging in.
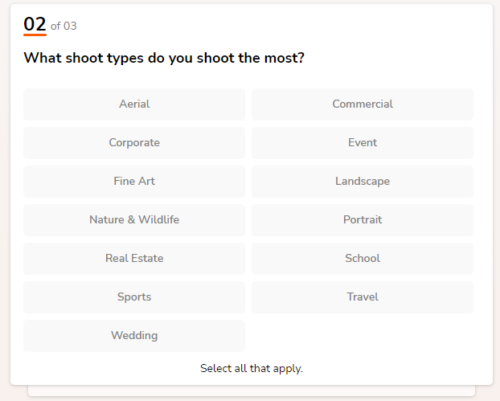
The next page is going to ask you what types of pictures you shoot the most.
I selected sports
The next question is asking what my goals are for my website.
Fair question
I’m selecting “Attract clients with a stunning website” and “Book clients and collect payments online”
Let’s see if this is added to the onboarding dashboard in a bit.
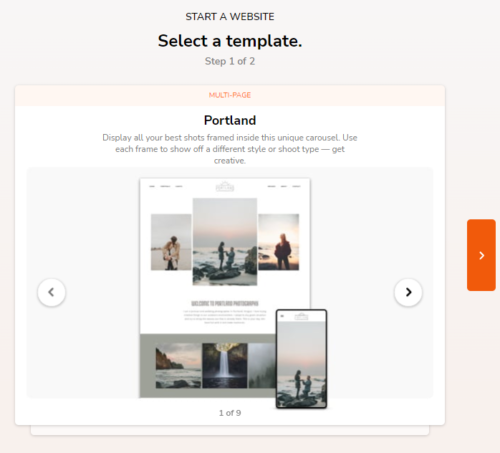
OK, now it’s having me pick my website template with 9 options to choose.
I chose the “Discover” one.
It then showed me a preview of my site which looked really nice especially since I’m not even in the dashboard yet.
After that, it’s going to ask you to either create a gallery or customize and publish.
I honestly wasn’t sure what to do here.
I feel eventually both but I had to go down one path for now.
From here I hit the create a gallery and this brought me to a page to upload some of my work or use sample photos Zenfolio provides.
Let’s go ahead and just use their photos.
After this they let you create the feel for your photo portfolio.
This is a nice little touch.
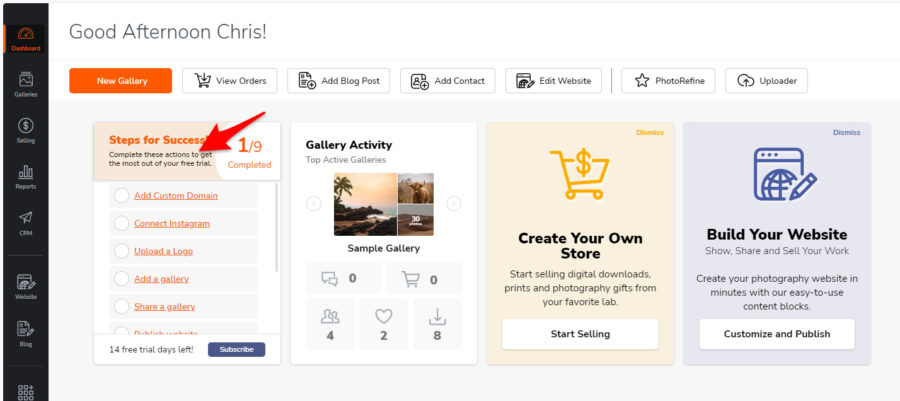
Ok, so now I’m at the main dashboard and I saw right away 9 steps to take to complete and get the most out of your free trial.
I like they worded it that way.
Knowing if you do this stuff you will get the most out of your free trial.
So within these 9 steps, it includes
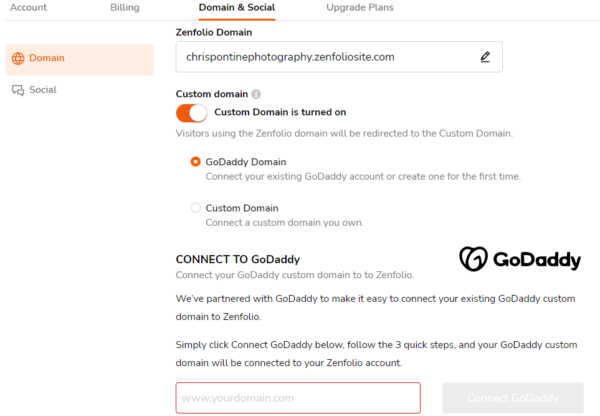
- Add custom domain
- Connect Instagram
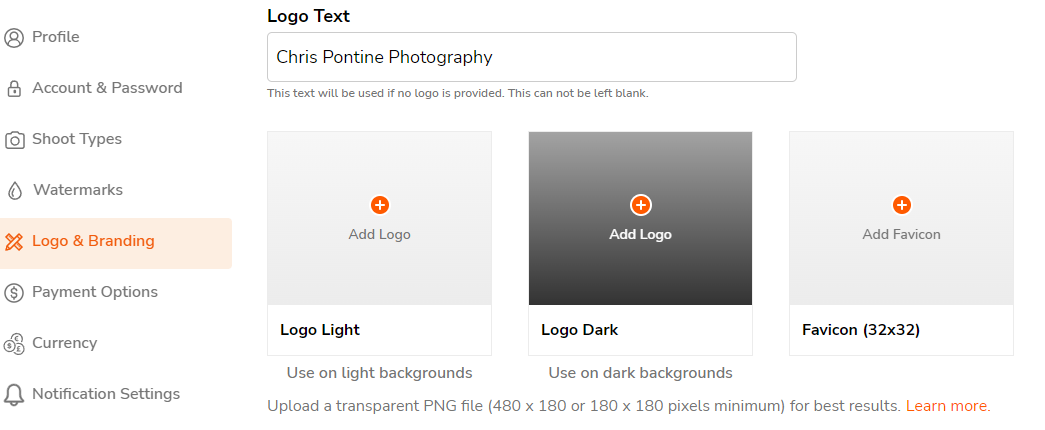
- Upload a logo
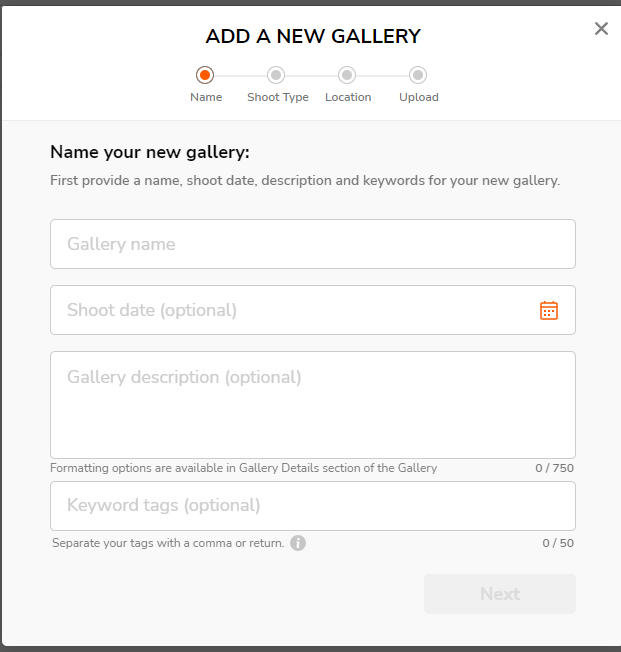
- Add a gallery
- Share a gallery
- Publish website
- Start selling
- Add a watermark
Under add custom domain I had the option to use the Zenfolio subdomain or I can connect my existing Godaddy account.
This is a nice little step.
If you go to Godaddy just purchase a domain there and then you can come back here and they will connect it since they have partnered to make it seamless.
I like this.
You can also connect a custom one too.
I’ve got to say overall I liked this step.
I feel Zenfolio made it easy too and always feel it’s a large learning curve when I talk to readers or clients on building a website.
The next step they are asking is to connect Instagram and just a FYI that’s right under the domain area.
You can connect social media accounts like Facebook, Twitter, and Youtube too.
The next part of the onboarding process for me is uploading a logo
One nice thing I like is adding the favicon is right here too.
The next is adding a gallery and some key info about it such as shoot data, description, and some keywords about your gallery.
I can see I can share the gallery next but I just skipped this one and went to publish website.
Once you click on that it shold look like the template you chose at the very beginning.
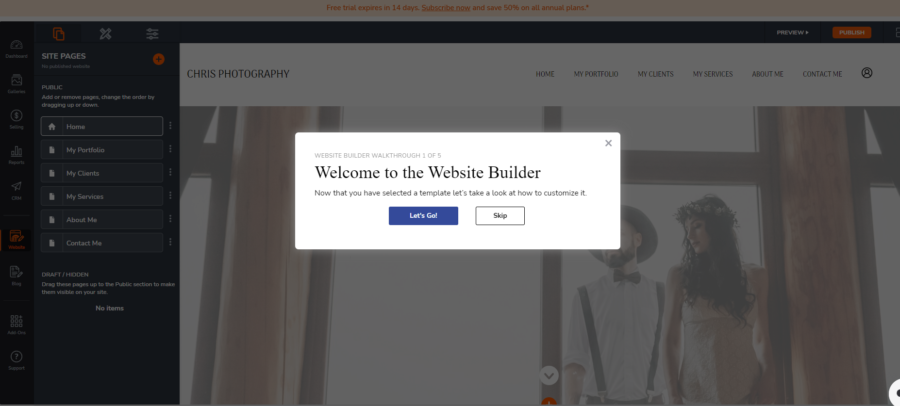
One thing I’m liking right away is the fact they have a website builder walk through to set you’re site up.
This is a nice touch and offers additional help as I’m getting this set up.
It was a bit differnt though it mainly just highlighted the key things to do instead of links and boxes to check off.
As I was editing it I noticed all the pages where just to the left and I could change my theme if I wanted at the very top.
I went ahead and hit publish.
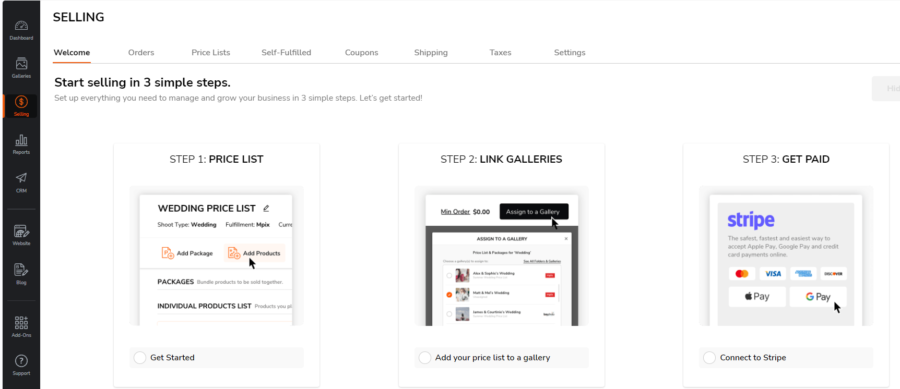
The next area I wanted to check out was “start selling”
I like this because it’s easily prioritized and 3 steps to get started.
I felt comfortable sitting here and walking through it setting it up.
If you look at the menu tab at the top too you will see some additional features that might be handy for you.
Overall I thought the onboarding process with Zenfolio was nice.
Obviously I have some finishing touches to do on my site or well you might on yours but all together a ton of help and it wasn’t overwhelming.
Zenfolio Pricing (And A Competitor Comparison)
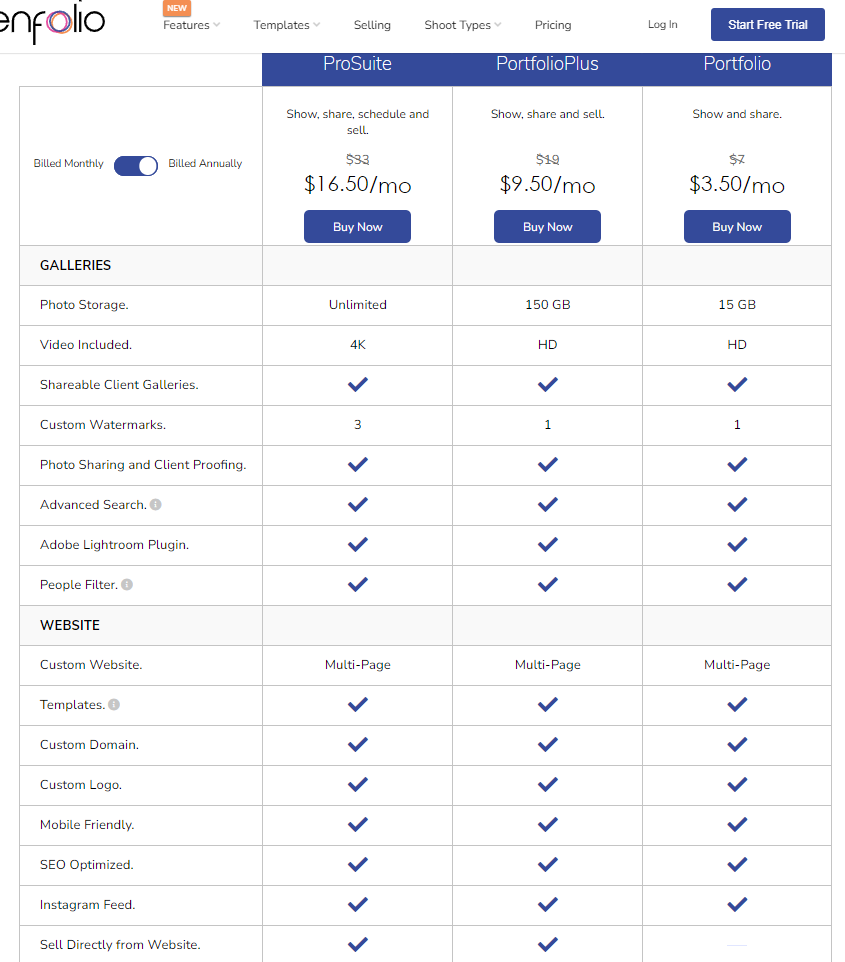
As you can see there are different pricing plans which are ProSuite for $33 monthly, PortfolioPlus for $19 monthly, and Portfolio for $7 monthly.
I know too in this picture there is a discount count.
But I’m just going with basic prices.
Here is a more broken-down chart showing some of the key features too you get with each plan.
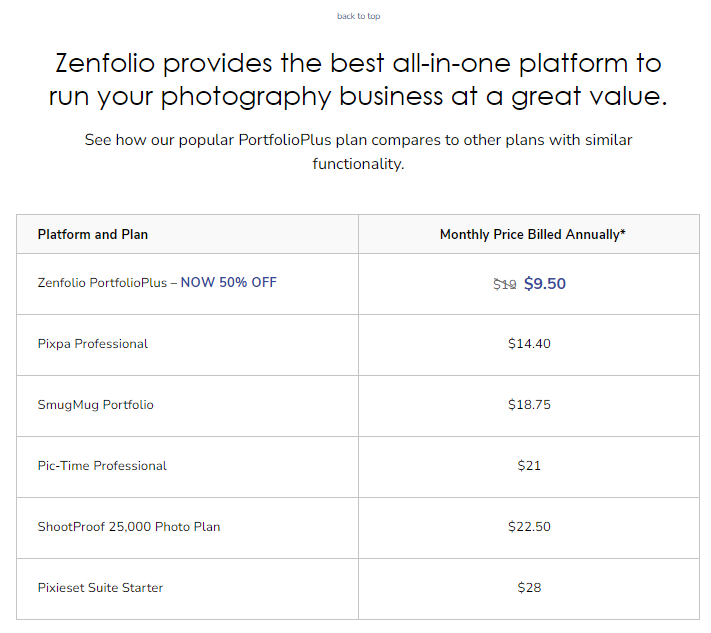
On top of that, I like they offer a comparison chart of other platforms they compete with.
That’s some good confidence Zenfolio.
Overall I feel Zenfolio has a fair pricing system in general with the features it offers.
Zenfolio Pros Your Gonna Like
Photographers need a large amount of bandwidth to display their best photos at the most appropriate size.
An unlimited amount
Users don’t have to sacrifice quality to meet the website’s guidelines.
In fact, they have better opportunities to sell because they’re able to include the best examples of their work not just what they could reduce in size to sell on a website.
Templates were designed to show off the skills and creativity of photographers by emphasizing visuals (photographs and HD videos).
Photographer Central helps clients discover photographers. The feature is yet another reason why Zenfolio isn’t just a photo-hosting website.
It’s an impressive multi-media option for photographers of all skill levels to showcase their work, build their business, and earn a living.
Through photos and HD videos, you grab people’s attention and get them interested in your body of work whether it be portraits, landscapes, or nature photography that you specialize in.
Always been a fan of this
Another impressive option offered by Zenfolio is its free trial.
Consisting of 14 days, you’re able to test site features without giving up your credit card information.
After the trial is up, you’ll be given the option to purchase a paid subscription.
The choice of membership plan you go with depends on how much you think you’ll use the website.
Even more importantly, if you pay annually, you save a considerable amount of money on whichever membership plan you’ve chosen for yourself.
Zenfolio Cons
- Has limited storage space
- Printing features will only let you ship to the United States
- Limited templates
Zenfolio Templates
There are twelve different templates to choose from and customize.
Each is high quality and easy to make your own.
There is a homepage option and gallery option for each template depending on your preferences in how your photos look and are arranged on the page.
The names of the templates listed on the website include:
•Ares
•Hemera
•Aura
•Persephone
•Hestia
•Veritas
•Concordia
•Invidia
•Nox
•Vesta
•Pomona
•Nesoi
After selecting the template that is right for you as a photographer, you’re asked to upload one to five photographs to get started.
Once that process is complete, you’re then able to add a webpage title, geographic location, and description of your website.
This helps others find your photography.
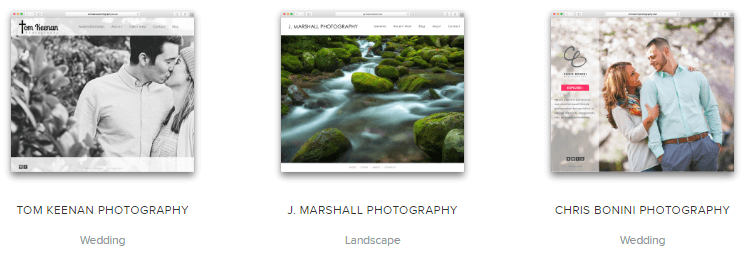
Here Are A Few Websites Using Zenfolio:
Zenfolio Fees
Zenfolio fees used to be significantly higher than they are today. In the past, they ranged in price per plan and currency.
As of November 2017, a flat 7% service fee for all product types, plans, and currencies is charged by the company.
This allows members to account for Zenfolio’s fees when calculating their own prices for photographs.
Vendor Fulfilled, Digital Downloads, and Self-Fulfilled products qualify for the flat service fee.
The service fee is based on the total selling price of the product, not the markup added by the photographer.
The new fee, of course, is minus photographer-issued discounts.
Zenfolio Customer Service
As with most websites these days, Zenfolio offers a Customer Support Center filled with information that helps users with their most pressing questions and concerns.
The topics addressed in the center include Training Videos, Online Training, User Forums, the Zenfolio Blog, Feature Ideas, and Contact Us.
Some of the more pressing topics for members to choose from include Frequently Asked Questions (FAQs), Getting Started, Managing Your Account, Organizing Photos and Videos, Customizing Your Website, Protecting Your Work, and Selling Your Work.
Zenfolio customer service agents are available to assist via email or chat.
Follow-up times are typically four hours from the time the message was sent via email.
It is recommended to contact photographers directly through their home or contact page with questions not addressed in the Customer Support Center.
When it comes to live customer support, Zenfolio is going to try and answer your question via their bot chat.
But, you will see an option to transfer to an agent for more help.
The one downfall I saw when reaching out is they were offline and I had to leave my name and email address.
How To Get Started Selling With Zenfolio (A few things to know)
Selling with Zenfolio is easier than you might have imagined. Everything is done through your account dashboard.
From there, you’re able to do the following things:
•View Reports
•Request Payouts
•Create New Template Designs
•Manage Existing Template Designs
•Add and Manage New Coupons and Campaigns
•Add and Manage New Gift Certificates
Zenfolio allows you to print and sell photographs, accept credit card payments, give clients access to their photos using a unique key, and create packages.
Best of all, you’re able to set your own prices and pay a low transaction fee of 7% which is less than it was in the past.
To get started selling on the site, there are some steps you’ll need to follow. This is how you add Vendor products:
1. First, fill out the Payout Profile information. This lets Zenfolio know how you’d like to receive the money that you make from your photography sales.
2. Next, create a price list.
3. Include the products you want to sell to the price list.
4. Determine the prices for the products.
5. Assign the price list to the galleries of your choice.
The same process goes for Self Fulfilled and Digital Downloads, but you’ll need to create the products before the price list, not vice versa.
Starter members must use base lab prices to sell their work. Pro and Advanced subscribers have more freedom by being able to set their own prices and sell more products. To access the Selling option, choose Selling.
The Selling Overview is a dashboard glance at all the selling features offered through the Zenfolio website.
It allows members to manage orders, keep track of payments, and create promotions.
Compare Zenfolio To Other Photography Website Builders Before Using
If you really want to compare and break down the other photography builders to Zenfolio, here are two spots to do that.
Top Photography Website Builders
Photography Website Builders Comparison Chart
Zenfolio Review Conclusion
As you can see Zenfolio offers a ton of features that can grow and show off your photography business.
And, all the tools to be able to showcase your work and sell online easily.
Consider:
Heading on over and test-drive it to see how it can help you out.
Quick question for you?
Have you had the chance to use Zenfolio yet? Or have been considering using it?
Also, what’s your thoughts on this Zenfolio review, anything else you would like to see?




I’ve been using Zenfolio (the PortfolioPlus plan) for the last 8 months. I started with creating a proofing gallery for a client. It was so easy to set up but more importantly my client thought so too. They ordered a lot of prints! Since I loved the proofing/selling I figured I’d try the website builder. I like that the templates are clean and modern and that they allow plenty of customization. There are a lot more features that I’m slowly starting to use. I just started using the booking/scheduling and it’s awesome. If you haven’t tried Zenfolio in a while… you should. it’s a whole new ballgame.
Hi Jenn,
Thanks so much for your thoughts on Zenfolio.
Thanks,
Chris
Hi, I’ve been taking photos for 40 years since a boy and finally decided during the covid crisis to take the plunge and chance my arm. I’m pretty used to using different tech online and setting up accounts so I can’t comment on zenfolio for less experienced people with IT. I found it pretty damn good tbh. I also tried smugmug, squarep and weebly first. Zenfolio to me has distinct advantages. It has very good multi platform connections, especially to lightroom. It allows own logos and copyright marks easily added. And mainly the Web page is additional to a Homepage which makes for easy usage imo. I’m at a point where my content is already up and website is nearly there. But I’m still in the trial period. Which is great and I haven’t had to part with money. I tried weebly and lost a month’s fee as I got so far in and found hidden fees not mentioned.
I’m at the setting up selling point. Which I’ve done but I’m not 100% confident with what the base lab selling means to me and whether I will be out of pocket or not til I switch to pro. Great article very useful. Any extra beginner tips on setting up selling appreciated.
Hi Nige,
Thanks so much for your thoughts on Zenfolio.
Thanks,
Chris
I have been with Zenfolio for over a decade. I find them to be easy to use and their templates work easily. I have options on how things look on the website. The only complaint I have is that they do not have a way to show the potential buyer how the print will look on their wall. I am looking into those services so I can provide a link on the website.
Hi Pam,
Thanks for your feedback on Zenfolio. Love hearing it.
Thanks,
Chris
It has been more than a year when Zenfolio UK decided to stop working with the great European supplier Photobox. As a result the only available option for printing that popular 5×7″ size was One Vision Imagine, which offers this size approx. 5 times higher cost! Their rip off price is £0.95 comparing with the £0.25 offered by Photobox.
More than a year after my complaint but Zenfolio did nothing about replacing the vendor with a new lab and reasonable prices. Perhaps UK is too far from the US?
As a result I’m asking from clients to not order small prints via my Zenfolio platform. It is a pain to now move my thousands of files from events to a different platform and leave Zenfolio. What a shame.
Hi Nek,
Thanks so much for your thoughts on Zenfolio.
Thanks,
Chris
If you are serious about your business as a professional photographer, I wouldn’t recommend Zenfolio. In such a competitive market, their platform lacks the tools and simplicity needed to help photographers like me conduct business with peace of mind. To stay competitive in any market you have to provide a beautiful and simple experience for the people using the service, and unfortunately, Zenfolio falls behind compared to other online services in performance, aesthetics and customer support. This at least has been my experience.
I have been having a horrible time even connecting to my website lately. We had an illness in our family that kept me away from my site for several months. When I came back to photography, I learned that my site used HSTS for security which no one uses anymore and I found my webmail gone. Tried contacting support – NO ANSWER!!!
According to Zenfolio’s website, their fees are 9.9%. I hope I am wrong on this and missing something..?? I am currently with Smugmug and looking to change as their fees are 15% across the board.
yes, the fees are 9.9% I do not have a problem with that. my only issue right now is there is not much choice on wedding invitations and other cards.
Is this 9.9% fee also on even fulfilled orders?
What’s going on? I am just starting out as an online photographer, looking for the right website that’ll also handle the lab and delivery side. I started with Squarespace but cancelled because it was not geared well for photography. Zenfolio seems good. But what about the above complaints?
Hi Paul,
Apologies for not seeing this comment.
I hope you found your answers.
Thanks,
Chris
We’ve been using Zenfolio as a platform to share the photos with our clients for about 8 years. In the last two years, the performance of their website has been questionable. Image uploads regularly hang, and image previews often take hours to generate. Their user forums have been overwhelmed with similar complaints. After months of allegedly “working on a solution”, one is nowhere in sight. I would not recommend them as a platform for anyone running a legitimate photography business. They have become a hinderance instead of a solution.
Hi Michael,
Appreciate your input on this.
I hope some resolution comes out about this.
Thanks,
Chris
They’re just thieves. I signed up in 2011. In 2015 and on they have been charging my unlimited account in over a thousand dollars for “raw storage usage charges”. We will be seeking legal action to reclaim the thousands they stole from us over time when they arbitrarily decided our original account was no longer unlimited.
Hi Jenna,
Wow, so sorry to hear all the issues you have been having.
Chris
Zenfolio is very bad. I have been a customer for years, just because I cannot moved my files away. They have absolutely no support even I always paid for the most expensive package on the web site , and one-off every year too. It’s an outdated and very bad service provider. Avoid and find another service provider that will really provide you with service. Find more updated design and real support. It’s very frustrating to be using them. The worst. I now also paid for https://pixieset.com/, which look much better, in terms of design feel. I hate zenfolio! and you can’t even find a place to express your dissatisfaction, and to seek support to help whenever you need it. There is always no help you can find. They even mess me up by selling album for me so I have zero profit!
I’m sorry to hear it hasn’t been a good experience
There is no way to do nested menus. Very frustrating.
ZF has not added themes in quite a long time. Why?
Hi There,
I’m not quite certain about why that is.
Have you talked to anybody over there?
Thanks,
Chris