My content is reader-supported by awesome people like you. Which means I could earn a commission. Learn more here!
Starting a Shopify store with no money might sound impossible, but guess what?
It’s totally doable!
If you’re eager to launch your online business but don’t have extra cash to spend upfront, you’re not alone.
Many aspiring entrepreneurs face the same challenge—wanting to build a successful store without breaking the bank.
The good news?
Shopify offers ways to get started for free, and with the right approach, you can turn your idea into a real online business without spending a dime.
In this guide, I’ll show you exactly how to create a Shopify store with no money, step by step.
Step-By-Step Guide: Setting Up Your Shopify Store Without Breaking The Bank
Want to start selling online but worried about costs?
You’re in the right place!
I’ve helped plenty of new store owners get started on Shopify, and I’ll walk you through the entire process using the latest information.
Let’s turn that business idea into reality!
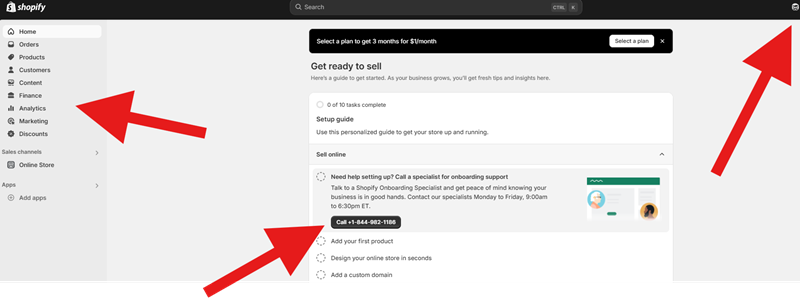
Step 1: Grab Your Free Trial
- Head to Shopify.com and click “Start free trial.“
- Enter your email, create a password, and name your store
- Fill out the quick business questionnaire
- You’ll get 3 days to explore Shopify completely free
Step 2: Build Your Foundation
- In your dashboard, go to “Settings”
- Add your basic info: business name, contact details
- Set up how you’ll get paid (Shopify Payments is easiest)
- Configure your shipping options
- Set up tax rates for where you’ll be selling
Step 3: Make It Look Professional
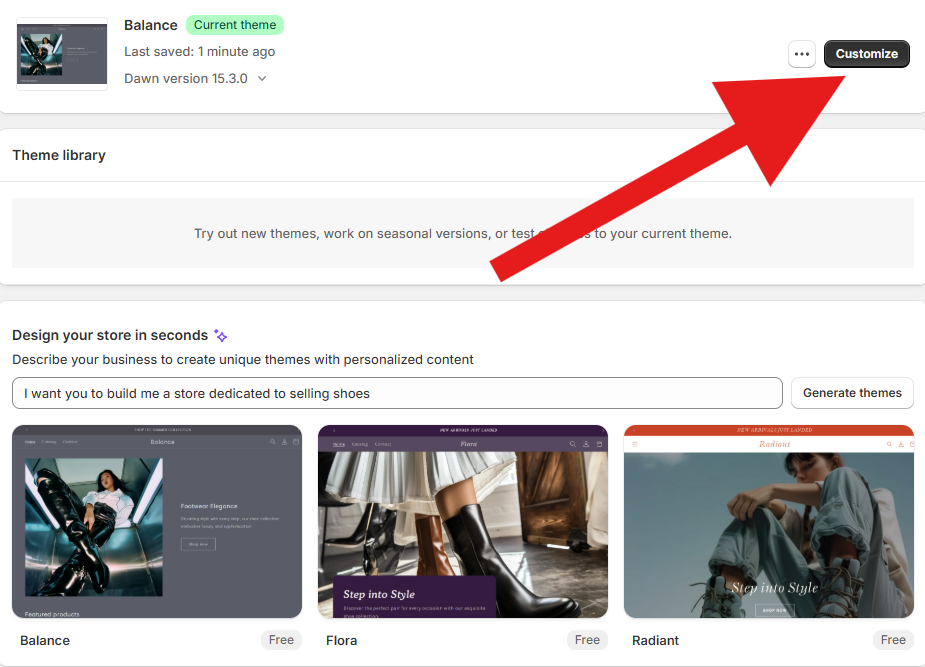
- Go to “Online Store” → “Themes”
- Check out the free themes (Dawn is super popular!)
- Pick one that matches your style
- Customize everything:
- Add your logo (create one free with Canva)
- Pick colors that match your brand
- Arrange your homepage to showcase your best products
- Set up your menus so customers can find things easily
Actionable Tip: Utilize AI to help build this out fully. You can see below where I typed in to create a store and it gave me some design examples ready to go.
Step 4: Create Must-Have Pages
- Go to “Online Store” → “Pages”
- Create these essential pages:
- About Us (tell your story!)
- Contact Info
- Shipping Details
- Return Policy
- Terms of Service
- Privacy Policy (use Shopify’s generator to keep it legal)
- FAQ page to answer common questions
Step 5: Start Dropshipping (No Inventory Needed)
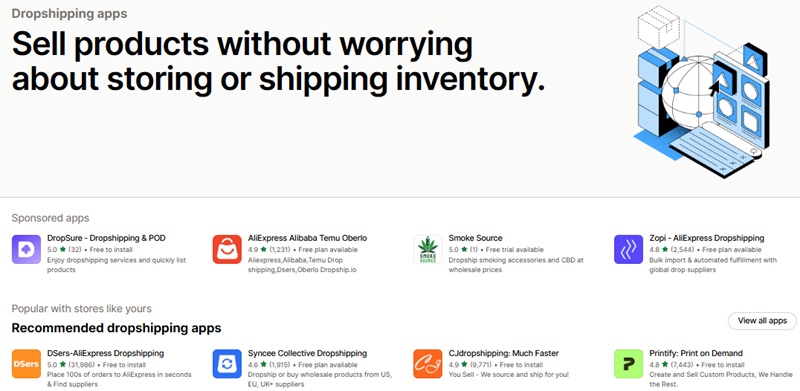
- Install a dropshipping app from the App Store
- Popular options: DSers, Spocket, or Printful
- Connect with reliable suppliers
- Verify that products are good quality before you list them
Step 6: Add Your Products
- Add items manually or through your dropshipping app
- For each product:
- Write clear titles with keywords people search for
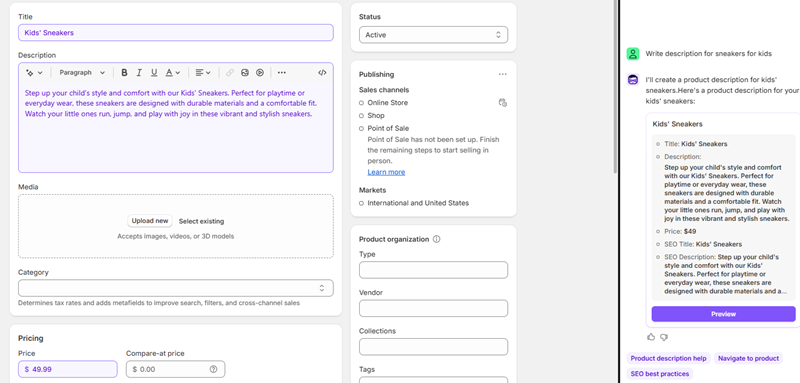
- Create descriptions that focus on benefits
- Use high-quality photos
- Set prices that give you room for profit
- Group similar products into collections
- Add options like sizes and colors
Actionable Tip I Use: Use AI to build out your product description.
Step 7: Set Up Your Web Address
- Go to “Online Store” → “Domains”
- You can:
- Use the free myshopify.com address
- Buy a custom domain ($14/year)
- Connect a domain you already own
- Pro tip: A custom domain looks more professional and trustworthy!
Step 8: Connect Marketing Channels
- Set up “Sales channels” to sell everywhere:
- Connect to Facebook, Instagram, and TikTok Shop
- Set up Google and Pinterest
- Use the free Buy Button on other websites
- Set up email marketing:
- Shopify Email gives you 10,000 free emails monthly
- Create automated emails for abandoned carts
- Welcome new subscribers automatically
Step 9: Test Everything
- Turn on test mode for payments
- Place test orders on your phone, tablet, and computer
- Make sure all emails are working
- Check your store’s loading speed
- Verify that everything works well on mobile
- Ask friends to try using your store
- Check for typos and broken links
Step 10: Launch and Start Marketing
- Set your store to “Public”
- Start free marketing:
- Create engaging social media content
- Write helpful blog posts related to your products
- Make sure your product descriptions help with SEO
- Join online communities where your customers hang out
- Reach out to small influencers for partnerships
- Encourage customers to share photos with your products
Important Things To Remember
- After your 3-day trial, plans start at $29/month
- You’ll pay transaction fees unless you use Shopify Payments
- Focus on a specific niche instead of selling random products
- Start with 10-20 great products rather than hundreds of okay ones
- Be prepared to spend time on marketing if you can’t afford ads
Following these steps will help you create a professional Shopify store with minimal upfront investment.
The key is making enough sales during or shortly after your trial to cover your monthly costs.
Stay patient and keep improving – success doesn’t happen overnight, but it does happen!
Dropshipping: Your Best Friend When You’re Broke
Dropshipping changed everything for me a while ago.
I didn’t have a ton of money so I started selling on eBay and would dropship.
This was a while ago, just FYI
But regardless, I’d make the sale and then send it their way.
Instead of buying products before selling them (which costs money I didn’t have), I found another way:
- Pick products you want to sell from suppliers
- Add them to your Shopify store with nice pictures and descriptions
- Let the supplier ship directly to customers when orders come in
No need to buy inventory first!
When a customer pays you, you use some of that money to buy the product from your supplier.
The rest is your profit!
Grab Shopify’s Free Trial With Both Hands
Shopify lets you try their platform for free for a while.
This is your chance to set everything up before paying anything.
During this time:
- Play around with all the tools to see how everything works
- create your online store to match what you want it to look like
- Add all your products so you’re ready to sell
My goal was to have everything ready to make sales before the free trial ended.
That way, the store could pay for itself from day one.
Making Your Store Look Great (Without a Designer)
People buy from stores they trust.
Shopify has free themes you can use to make your store look professional.
TIP: Pick a simple, clean theme that’s easy for customers to use. Fancy isn’t always better!
When I started, I chose a basic theme and focused on making sure:
- Customers could easily find products
- The store worked well on phones (where most people shop nowadays)
- Everything looked clean and professional
Writing Product Descriptions That Actually Sell
The way you describe products can make or break your sales.
Here’s what worked for me:
- Focus on how the product helps customers – not just what it is
- Use clear, beautiful pictures that show the product well
- Add words people might search for to help them find your store
Marketing Your Store When You Have No Budget
With zero dollars for ads, I had to get creative.
Here’s what actually worked:
- Share interesting posts about your products on Instagram, TikTok, and Pinterest
- Write helpful articles related to what you sell. Content marketing has always been a good source.
- Team up with others who reach similar customers but don’t compete with you
I started an Instagram account showing how people used my products in real life. It didn’t cost anything but time and brought in my first customers.
Taking Care of Orders and Customers
Once orders start coming in:
- Make sure your suppliers ship things quickly
- Keep customers updated about their orders
- Answer questions fast and solve problems right away
Happy customers tell friends.
Unhappy customers tell everyone!
The Good and Bad of Starting With No Money
| Good Stuff | Challenges |
|---|---|
| You risk almost nothing | Free themes limit how unique your store looks |
| You can sell tons of different products | You depend on suppliers for quality and shipping |
| You can test if your idea works | You need to put in time for marketing |
| You learn as you go | You might need to switch suppliers if problems happen |
Simple Tips That Made A Big Difference For Me
- Start with just 10-20 products instead of hundreds. I personally always felt I was trying to do too much to start. Focus in on a niche and go to work.
- Focus on one type of customer rather than trying to please everyone
- Ask friends to check your store before launching to catch problems
- Take your own product photos if suppliers’ images look cheap
- Answer customer messages super fast to build trust
- Utilize other platforms such as Etsy. I was helping a client out and we built out a Etsy page and I noticed I was able to get it ranked for some good keywords fast. This got her brand out there and visible.
Here’s a well-structured FAQ section for your blog post, “How to Create a Shopify Store for Free.”
Frequently Asked Questions (FAQ)
1. Can I really create a Shopify store for free?
Yes! Shopify offers a free trial (typically 3 days or more, depending on promotions) that allows you to set up and explore your store without paying upfront. However, after the trial period, you’ll need to choose a paid plan to keep your store active. A lot of times though they are offering some pretty solid deals where you can get $1 a month up to 3 months.
2. Do I need a credit card to start a Shopify free trial?
No, Shopify does not require a credit card to start the free trial. After the free trial they will need it during the promotional period.
3. What features are included in the Shopify free trial?
During the free trial, you get access to:
- Store setup and customization
- Product uploads
- Basic order processing
- Shopify’s dashboard and analytics
- Free themes and branding options
However, you won’t be able to process live payments until you choose a plan.
4. Can I sell products during the Shopify free trial?
Yes, you can add products and set up your store, but you won’t be able to accept customer payments until you activate a paid plan.
5. What happens when my free trial ends?
When your trial expires, Shopify will ask you to pick a paid plan to keep your store running. If you don’t select a plan, your store will be paused, but your data will remain saved for a limited time. They may email you to extend your deal.
6. Are there any free alternatives to Shopify?
Yes! Some free eCommerce platforms include:
- Big Cartel (for small stores with limited products)
- WooCommerce (if you have a WordPress site)
- Square Online (offers free online store options with transaction fees)
These platforms may have limitations compared to Shopify, but they allow you to sell products without a monthly fee.
7. Can I get a discount on Shopify after my free trial?
Yes! Shopify frequently offers promotions, such as $1/month for the first three months on select plans. Keep an eye on Shopify’s pricing page for current deals.
8. How can I make the most of my Shopify free trial?
To maximize your trial:
- Set up your store’s design and branding
- Add products and write compelling descriptions
- Explore Shopify apps for marketing and automation
- Test different features to see if Shopify fits your needs
Tip: Utilize their AI features they have to make it really seamless right in the dashboard.
9. Can I extend my Shopify free trial?
Shopify occasionally offers trial extensions on a case-by-case basis. You can contact Shopify support and ask if they can extend your trial.
10. Do I need a domain name for my Shopify free trial?
No, Shopify provides a free .myshopify.com subdomain, but you can buy a custom domain for a more professional look. I’ve noticed when they do you usually get a few emails.
My Final Thoughts
Starting a Shopify store with no money isn’t easy, but it’s totally possible.
I did it by using dropshipping, maximizing the free trial, and working hard on free marketing.
The best part?
I could test my business idea without risking my savings.
Remember that building a successful store takes time.
Don’t expect overnight success.
Stay patient, keep learning, and be ready to change your approach when needed.
Your first sale might take weeks, but that feeling when the order notification comes in?
Have you tried this method?



Leave a Reply